API Testing with Postman: A Beginner’s Step-by-Step Guide
Introduction
Have you ever wondered how apps like Instagram, YouTube or even your favourite weather app get data from different places so quickly? Behind the scenes, they use something called APIs. APIs are like messengers that allow apps to talk to each other. But just as we test video games prior to releasing them, APIs must be tested to ensure they run properly and effectively. This is where API testing comes in.
In today’s software development world, API testing is a big deal and one of the most popular tools for doing it is called Postman. Whether you are learning on your own or through great online resources like Software Testing Course, Postman is usually one of the first tools you will use to learn how APIs are built and tested. And it’s loved by beginners and professionals alike because it’s powerful yet easy to understand.
This blog is written for newcomers, who just have started their career in this field and help them to understand what API testing is, what Postman does, and how you can actually test real APIs on your own using Postman.
What is API Testing?
Definition and Role in Software Testing
An API (Application Programming Interface) is somewhat similar to a waiter in a restaurant. It takes requests, sends them to the right system and takes back a response. In software applications, APIs are the bridge between components or services.
API testing ensures that communication like above is working as intended. Testing will ensure that the right data is sent or received, right responses are returned and errors are handled properly. Testing also tests the performance of the API, e.g. response times, and looks at performance in the timelines of edge cases, e.g. invalid input or slow servers.
This matters because modern applications are using APIs extensively. An API that goes down can cause widespread failure in the application, so good API testing is critical to ensure the foundational stability, performance, and usability of the applications.
Types of API Testing
There are many variations of the testing depending on what you want to test.
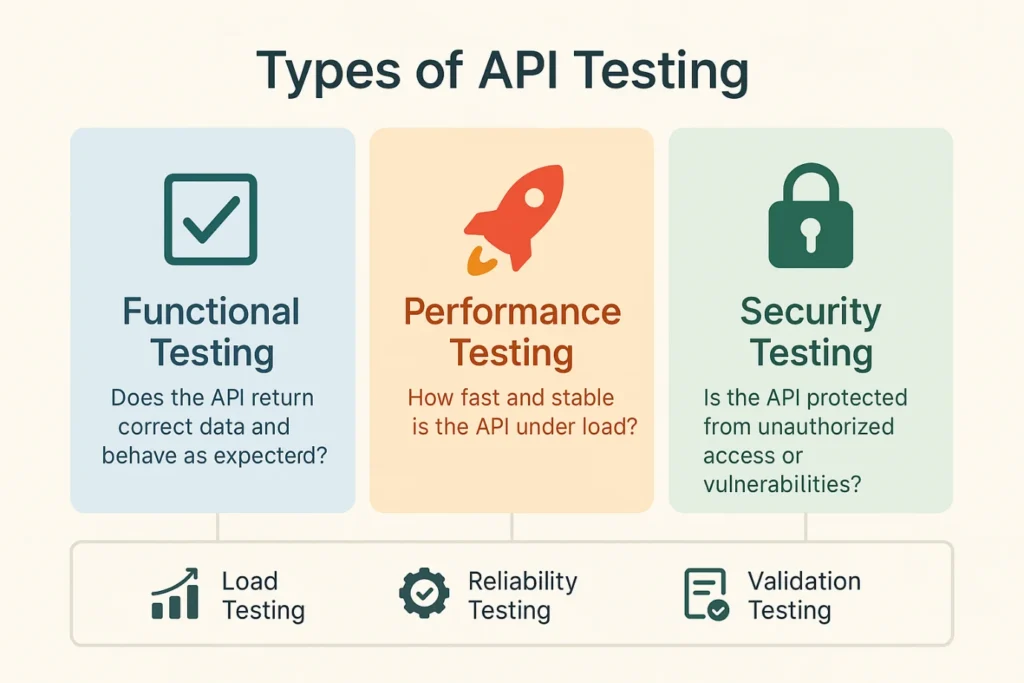
- Functional Testing is confirming the API actually performs the function it is supposed to. For example, you ask the API for information about a user; does it return the correct information?
- Performance Testing is all about speed. It tests how fast an API responds when a lot of people are using it at once or processing a lot of data.
- Security Testing confirms the API is secure. It tests if only authorized people can access the information and exposes vulnerabilities that could be exploited by hackers.
The three above are the most common, but there are others like load testing (API test under load), reliability testing (confirm the API is uptime), and validation testing (confirm data format and correctness).
What is Postman?
You can send different types of requests:
- GET – to get data
- POST – to send new data
- PUT – to update data
- DELETE – to delete data
Postman is very easy to use and gives you a clean response from the server.
Why do people love Postman? Because it has a low barrier to entry, yet is still powerful enough for the pros. You can organize your requests, you can write some simple tests, and even automate the tests. It runs on just about every computer type. Even better, it has a FREE version with a ton of functionality.
Setting Up Postman for Testing
Installing Postman
Getting everything downloaded and installed for Postman is painless:
- Go to Postman’s website
- Download either a Windows version, Mac version or Linux version.
- Just run the installation package and follow the prompts.
- Once the install is over, open Postman
There is also an option for Postman that does not require installation: it is a web version of the application, however, it will likely be easier to use the standalone desktop application.
Understanding the Postman Workspace, and Making Your First Request
Once the Postman App is installed open it and you will be able to see the unique workspace area where you will be creating requests. In order to make your first request, follow these steps:
- Click on the “New Button” or “+” tab towards the top to start a new request tab.
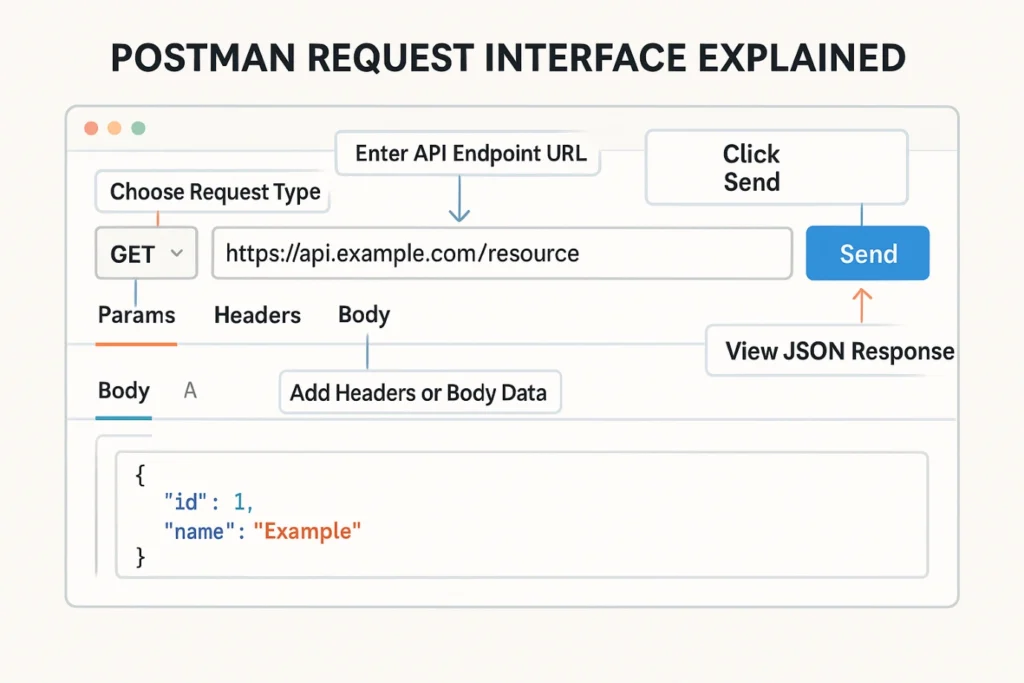
- Type, or copy and paste the URL of the API you are testing in the field.
- Next, simply click on the “Send” button.
- Notice the response underneath and see what the API returned.
You will be able to save requests and store them in collections that allow you to structure your requests, and reuse them at a later time.
Writing and Managing API Tests in Postman
Adding Test Scripts and Assertions
pm.test(“Status code is 200”, function () {
pm.response.to.have.status(200);
});
Or you can check if a specific part of the data is present and correct:
pm.test(“Title is present”, function () {
var jsonData = pm.response.json();
pm.expect(jsonData.title).to.not.be.empty;
});
These tests will execute automatically each time you send the request.
Using Environments, Variables, and Collections to Organize Tests
- Environments are variable groups that you can switch out, one group could be “development” servers, while another group could be “production” servers.
- Variables are pieces of data that you want to be able to reuse; for example, URLs or tokens that you would like not to type again and again.
- Collections are groups of your API requests. Using collections, we can use grouping to run a set of tests from related requests more easily, and even share them.
How API Testing is Done with Postman
Let’s now break down what you can do to perform actual API testing using Postman step by step. This is the fundamental part of all of it and getting an understanding can help you feel confident in testing APIs by yourself.
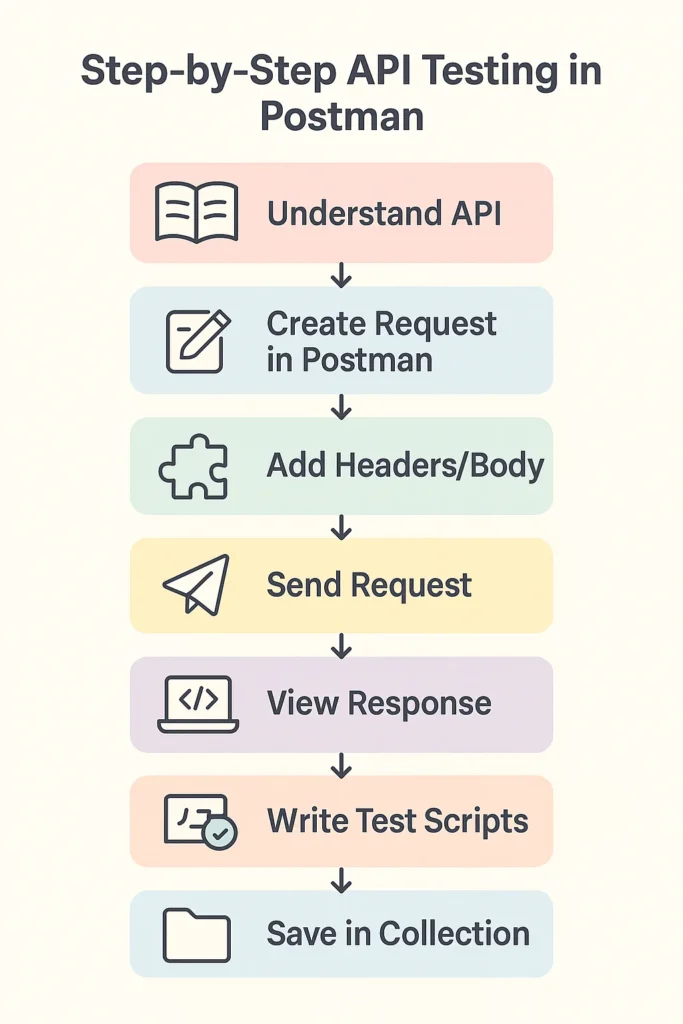
Step 1: Understand the API you want to test
Before sending any requests, you have to know what the API does. Normally, APIs will have documentation that will tell you;
- What endpoints (URLs) are available.
- What HTTP methods (GET, POST, PUT, DELETE) you should use against each endpoint.
- What data or parameters to send.
- What the expected response looks like.
Reading the documentation is similar to reading a recipe before cooking.
Step 2: Create a New Request in Postman
Open Postman, and click New > HTTP Request or utilize the “+” button to open a new tab
- Choose HTTP method (e.g. GET for data retrieval)
- Enter full API URL in address bar
For example, a public API URL for getting data about a post might look like:
Step 3: Add Headers or Body Data (if needed)
Some APIs (often referred to as web services) will ask for additional information like headers for authentication tokens or data to be sent.
- Headers are used to carry more information about your request. You might need to instruct the API that you want the response delivered in JSON format by placing the header:
- for POST or PUT requests, you’ll pass the data in the body. You can write this data in the body, in JSON format, in the Body tab.
If you are a beginner, you may want to start with GET requests as they are less confusing.
Step 4: Send Request and view Response
Press the Send button. Postman will show you:
- The status code e.g. 200 OK (means success)
- The response time (or how long the API takes to respond)
- The response body (which is data, usually in JSON format)
This allows you to ensure the API is functioning as intended.
Step 5: Create Tests to Automatically Validate Responses
You may want to write test scripts to verify that the API continues to work as expected.
You will write JavaScript code, in the Tests tab, that will run automatically after the response is received.
pm.test(“Status code is 200”, function () {
pm.response.to.have.status(200);
});
Or check if the response contains certain data:
pm.test(“Response contains userId”, function () {
var jsonData = pm.response.json();
pm.expect(jsonData.userId).to.exist;
});
Step 6: Use Variables and Environments for Flexibility
If you test the same API in different places (like a test server and a live server), managing URLs and tokens manually can get confusing.
Postman lets you create variables and environments:
- Define variables like {{baseUrl}} and set it to your API’s base address.
- Create environments named “Development” or “Production,” each with different variable values.
- Use these variables in requests, so switching servers is easy.
Step 7: Organize Your Tests with Collections
Collections are groups of saved API requests.
- You can save your requests in collections and run them together as a group.
- The collection features make it easy if you want to group multiple endpoints as part of one big test.
- You can share collections with your teammates for collaboration.
Step 8: Automatically Run Collections (Bonus)
After you have completed your collection, you can automatically run all tests in sequence with Postman’s Collection Runner. This is great for testing many APIs concurrently and can help with doing testing on a regular cadence.
Example: A Simple API Test with Postman
Try this example to get hands-on experience:
Send a GET request to: https://jsonplaceholder.typicode.com/posts/1
In the Tests tab, add:
pm.test(“Status code is 200”, function () {
pm.response.to.have.status(200);
});
pm.test(“Post ID is 1”, function () {
var jsonData = pm.response.json();
pm.expect(jsonData.id).to.eql(1);
});
pm.test(“Title is not empty”, function () {
var jsonData = pm.response.json();
pm.expect(jsonData.title).to.not.be.empty;
});
Click Send and check that all tests pass.
This shows how you can check both the status and content of an API response.
Conclusion
API testing is important to ensure applications are functioning correctly behind the scenes. Postman makes testing APIs easy without complex coding. By learning how to set up Postman, make Requests, write Tests, and organize your work, you learned and develop skills that are valued and used by developers and testers around the world.
If you would like to continue to learn or become an expert, the galaxy of resources such as Software Testing Training can get you started.

