Automating API Tests in Postman: A Beginner’s Next Step
Introduction
APIs are the pieces of the puzzle which enable various software systems to communicate with one another. They exchange data, and they drive everything from weather forecasts to online shopping checkouts. But how do we ensure APIs perform as required every time? That’s where API testing comes into play. And for anybody who has already gotten their feet wet with Postman for manual testing, the next logical step is automating those tests.
If you are already manually testing APIs with Postman, you hve probably thought to yourself “Can I speed this up?” or “Suppose I need to test the same thing repeatedly again and again?” That’s where API test automation comes in to save your time, eliminate errors and ease your life so much.
Before we get into the technical, if you want to develop a good foundation in testing principles, I strongly suggest going through this Software Testing Course. It’s an awesome way to grasp basic principles before increasing your automation level.
And now, let’s proceed one step further together, automating your API tests in Postman
What is API Test Automation?
- Manual Testing: You open Postman, click “Send,” and read the response.
- Automated Testing: You run a script or a test suite that checks multiple requests, validations, and edge cases — all automatically.
When and Why to Automate
You should automate API testing when:
- You repeat the same tests often
- You want fast feedback on changes
- You’re integrating APIs into larger applications or pipelines
Automation saves time, improves accuracy, and lets you test more — without doing more.
Why Use Postman for API Automation?
Overview of Postman as a Testing Tool
Features for Automate
- Tests tab: Write JavaScript based tests
- Collections: Group requests with tests attached
- Variables: Set-up different testing environments
- Collection Runner: Run test suites in bulk
- Newman: Run tests from the terminal or CI pipelines
Why This is Great for Beginners
Getting Started with Postman
Making your initial API request
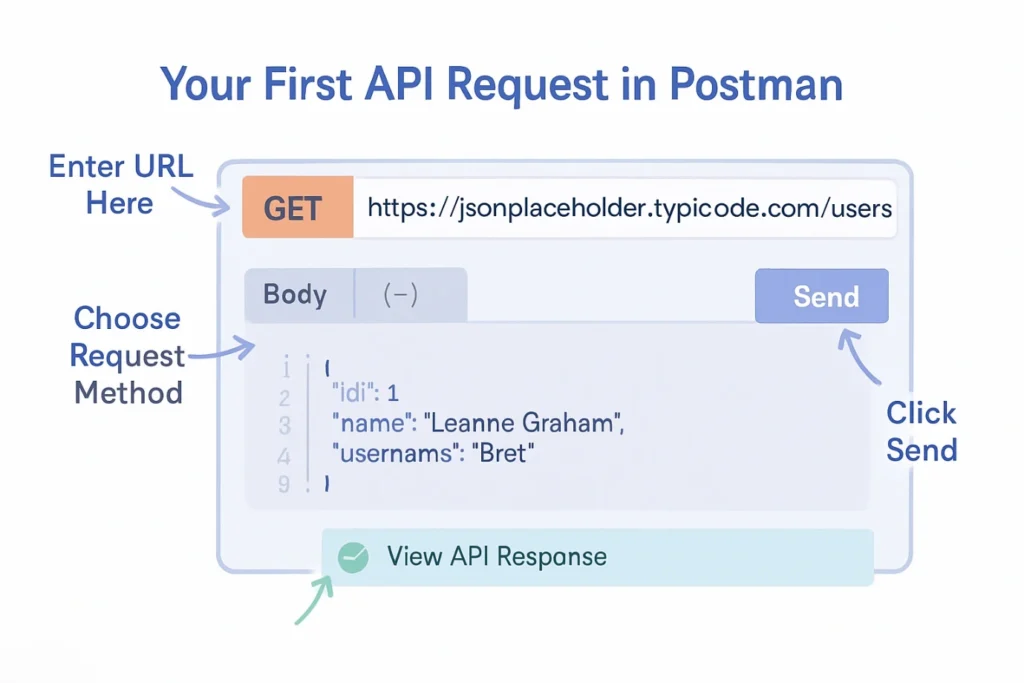
- Open Postman: Click to open the Postman app on your computer.
- Input an API Endpoint: In the bar at the top of the request, type or paste an API URL — for instance, https://jsonplaceholder.typicode.com/users.
- Send the Request: Press the Send button in order to send your request to the server.
- See the Response: In seconds, Postman will show the response with the status code (such as 200 OK), the response headers, and the data (typically in JSON).
Congratulations! You’ve successfully sent your first API request and received data back from the server. This is your first step toward mastering API testing and automation.
Summary of Collections and Environments
- Collections: Collections are a way to group related API requests together allowing to separate collections by function. For example, the user management requests are kept in a user management collection, and product requests are kept together in a product collection. Grouping requests in collections will keep your workspace organized and help you to run multiple tests in a short time.
- Environments: Environments allow you to create reusable variables like {{base_url}}, {{token}}, or {{userId}} that you may need in multiple requests. Instead of having to type those values each time, you set them once in the environment and then when you need to use them, you can reference the variable using a set of double curly braces.
In summary, using collections and environments together is a strong basis for effective and menuable API test automation. The two features help keep complex workflows managed easily, make switching between development environments practical, with little overhead to scale your tests.
How to Automate API Testing in Postman
1. Writing Automated Test Scripts in the Tests Tab

Postman also gives you ready-made test snippets. You can just click to insert and then customize them — perfect for speeding things up.
Tests you can write:
- Status code validation
- Checking JSON response fields
- Verifying headers
- Validating response time
2. Using Pre-request Scripts and Postman Snippets
This can be useful for:
- Generating tokens
- Creating dynamic timestamps
- Running setup logic before each request
Together, pre-request and test scripts let you automate both setup and validation.
3. Creating a Test Suite with Collections
Instead of testing requests one at a time, group related ones into a Collection. This becomes your automated test suite.
Each request can have its own test script, or you can use folder-level scripts to apply checks to multiple requests at once.
- Login API → Test token
- Get Profile → Validate user data
- Update Profile → Confirm status code
Collections help organize your testing logically and efficiently.
4. Running Automated Tests with the Collection Runner
The Collection Runner lets you execute a group of requests in one go — and it shows you which tests passed or failed.
Steps:
- Click “Runner” in the sidebar
- Select a collection
- Choose environment
- Click Run
Features:
- Runs all requests sequentially
- Supports data-driven testing with CSV/JSON files
- Generates a test result summary
This is your main automation engine inside the Postman UI.
5. Using Environment & Global Variables in Test Automation
Variables make your tests flexible and reusable. You can store:
- Base URLs ({{base_url}})
- Tokens ({{authToken}})
- Dynamic values like user IDs
Define them in environments or globally, then use them in URLs, headers, or test scripts.
This helps you:
- Avoid hardcoding
- Test across multiple environments
- Keep things organized
6. Viewing, Interpreting, and Exporting Test Results
- Green = test passed
- Red = test failed
- Yellow = test skipped
- Which request failed
- What assertion failed
- Actual vs expected response
Advanced Automation with Newman
What is Newman and Why Use It?

Newman is the command line companion tool for Postman that allows you to run your API collections right from the command line. It’s useful for many situations but particularly whenever a test should run outside of the Postman application, such as in your continuous integration (CI) pipelines or as part of a scheduled script.
You can run collections, use environments, and generate reports, all with simple commands. This makes it easy to work Postman tests into an already established build system like Jenkins, GitHub Actions or GitLab CI.
Shoot, you can even use Newman in many of your automated test cases. It’s lightweight, fast, and perfect for teams attempting to scale their testing through automation.
Running Tests via Command Line
bash
CopyEdit
npm install -g newman
bash
CopyEdit
newman run your_collection.json -e environment.json
Recommendations for Newbies
1. Keep your tests modular
Separating each test so it performs one check. This makes it easy to debug and narrow down a failure when a test fails. Modular tests are also easier to read, debug and maintain. You can also improve the readability and accuracy of your test reports. If you need to make changes in your logic, if it is in a modular code, you can make the updates without forcing comparison with other checks.
2. Use Variables: No hard code value for you
Instead of typing (pasting) the same token, base URL, or user ID everywhere, use Postman variables. You can keep your tests flexible and easily updated. You can change environments without retyping your requests.
Variables help to reduce duplication and more importantly reduce human error. Variables are a must-have when using tests in team environments or across dev/staging/prod.
3. Start small and grow
Automate key tests first, than grow your suite
Start automating the higher priority or frequently called endpoints first. Once you feel these are stable, continue to add more tests gradually. The gradual approach will help define what manageable really means and help avoid overwhelm on day one.
Beginning from the small foundation also gives you the opportunity to build confidence and rethink your strategy. As the API grows, so can your automation – in an expert and organized way.”
4. Clearly name your tests: It helps with debugging
Use meaningful names on your tests like, “Check status 200” or “Check if user has email”. Meaningful names help you see what failed and why, in an instant. This is a simple change that saves you time.
It also helps other team members, as they are reviewing your tests. Don’t use vague names, like “Test 1.” Use clear and contextual names.
5. Create folders within collections: Break things up
Organize API requests into folders based on context e.g. Auth, Products, Orders. This makes large test suites feel manageable and easier to navigate. Forms of structured collections are easier to share and scale.
Using folders also allows you to apply scripts at a folder level, so you can reduce the copy and pasting you do in your tests. These are great changes to use during team collaboration and CI/CD.
Conclusion
If you are a developer or tester, one of the smartest things you can do is automate API testing in Postman. This will speed up your testing, simplify the process, and trust your tests more because all of the best practices will be followed, and it really is easy.
You do not have to be a professional coder, but with Postman, a couple of test scripts, and some organized collections – you can automate very powerful workflows which can be built upon as your projects progress.
Postman has everything you need to start in order to ensure that you can automate testing, whether you are just testing or integrated with CI/CD pipelines. If you really want to grow your testing skills, consider taking a Software Testing Course to develop a solid foundation in the principles of testing and an automation strategy.
Now you are all set to get started from just clicking “Send” – to real automation.

